
Like many focused assessments, a cardiac assessment requires a systematic approach–partly so we don’t miss anything indicating dysfunction, and partly because there are so many important components that give a complete picture of cardiovascular function.
Following a review of patient history for past conditions such as rheumatic fever that affect heart valves, always begin the assessment with looking. Always perform focused assessments in the following order: observe, then listen, and last, but definitely not least, palpate.
If we touch the patient before we observe, we miss vital clues gained by watching the patient behave, respond, move, and breathe. In some cases, touching before observation can alter the assessment outcome and mislead the nurse. For example, if a patient has pain with palpation, this may speed up breathing or pulse at rest.
Always initially ask yourself what you notice about the patient at first glance. Across-the-room assessment and how the patient responds to the nurse can provide clues about ventilation and perfusion through focused observation of posture and ease of breathing. This allows the nurse to prioritize nursing actions at the start and match assessment findings with signs and symptoms later in the assessment. A patient with pale or dusky skin may need oxygen saturation checked before assessing heart valves because the nurse chooses to administers oxygen when saturation confirms suspected hypoxia based on skin color. Correcting urgent problems takes priority over further assessment!
So things to LOOK for:
- Observe if the patient is in distress and note overall condition of the patient including symptoms of cardiac ischemia, end-organ perfusion, peripheral circulation, and hydration status.
- Ask about symptoms like shortness of breath or chest pain.
Although the most common symptom of cardiac ischemia is retrosternal chest discomfort often described as “pressure”, “crushing pain”, or “tightness”, there are many symptoms that should be investigated until acute coronary ischemia is ruled-out. But more on that another time!
Expert Tip: Symptoms of myocardial infarction or CHF in pediatric patients are often related to an undiagnosed congenital heart defect.
Listening
Once you have a good initial impression, move on to step 2: listening with your stethoscope.
Assessment of the heart valves takes practice.
Like lung sounds, a provider’s ear must train through practice hearing the good, the bad, and the ugly. Although nurses are not expected to master this skill straight out of school, those who wish to specialize in cardiovascular nursing can make gains by practicing early-on.
Expert Tip: Seek out nurse preceptors on your clinical rotation that love cardiac and follow them around during morning assessments, and find amplified audio files for adventitious sounds to listen to over and over. It’s a great way to master heart and lung sounds.
As with lung sounds, heart sounds should be relatively quiet. A lot of extra noise indicates blocked flow from valves. This happens when valve parts are not closing tightly and smoothly, or the heart muscle is pumping in an uncoordinated fashion.
#vhd
Many common valve disorders result from either diseased valve leaflets or abnormal heart wall structure (think congenital heart disease or myocarditis). A swooshing sound may be heard with turbulent flow of a systolic beat. This can be an indication of stenosis or ineffective blood flow.
[video width="640" height="360" mp4="http://blog.nclexmastery.com/wp-content/uploads/2018/11/vhd.mp4"][/video]
All that aside, there are two sounds you should expect to hear and identify…
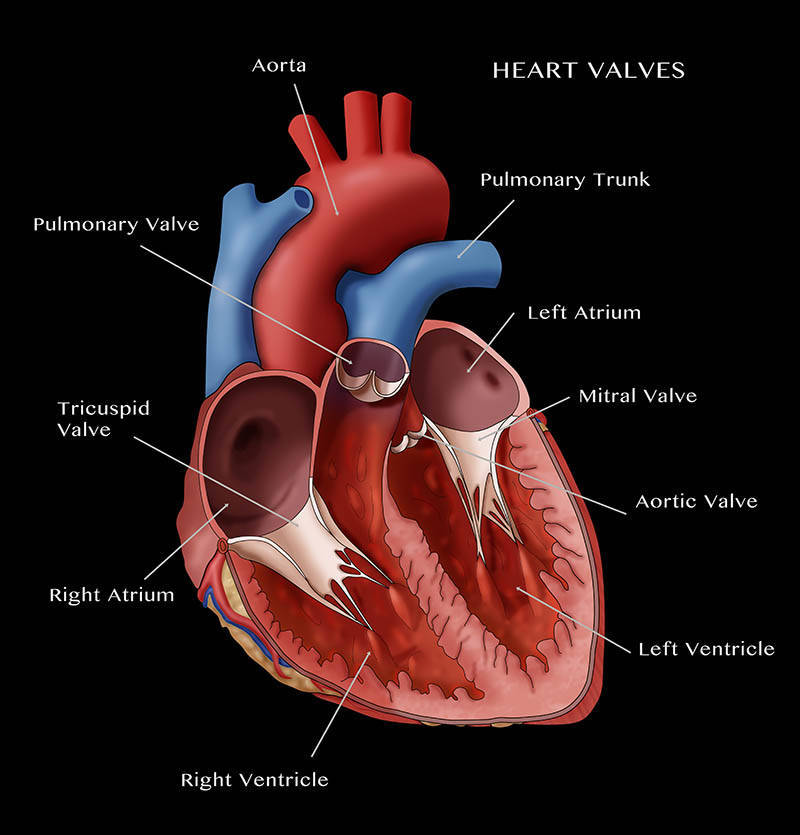
The best way to approach heart valve assessment is to first remember that the sounds are made by valves opening and closing.
This action happens twice during the cardiac cycle. Each time, there are two valves in motion. How smoothly the heart accomplishes this indicates how well the valves and heart muscle functions and also may give clues about abnormal fluid status.
There are 4 valves in the heart system that correspond with sounds we expect to hear for normal function. Each sound involves two valves. To determine which valve is making the sound, we use landmarks that lie near each valve.
How to LISTEN: A Landmark Lesson
Listen for heart sounds beginning with the widest area of the stethoscope, the diaphragm. This side picks up higher-pitched sounds. Note the rate and rhythm. Assess for the following: S1 and S2 sounds, extra heart sounds, or murmurs. Then listen with the smaller side–the bell which amplifies low-pitched noises such as murmurs. This side is especially good at detecting turbulent flow we talked about.
The diaphragm may be used as it has a wider area for picking up carotid sounds for a varied patient anatomy, however the bell is effective in detecting these sounds which are low in pitch. Assess heart sound characteristics by auscultating with the diaphragm of the stethoscope over the 5 primary landmarks: aortic area, pulmonary area, mid-sternal edge, lower-sternal edge, and apex.
Z-Pattern KEY
A - Aortic
B - Pulmonic
C - Erb’s point
D - Tricuspid
E - Mitral
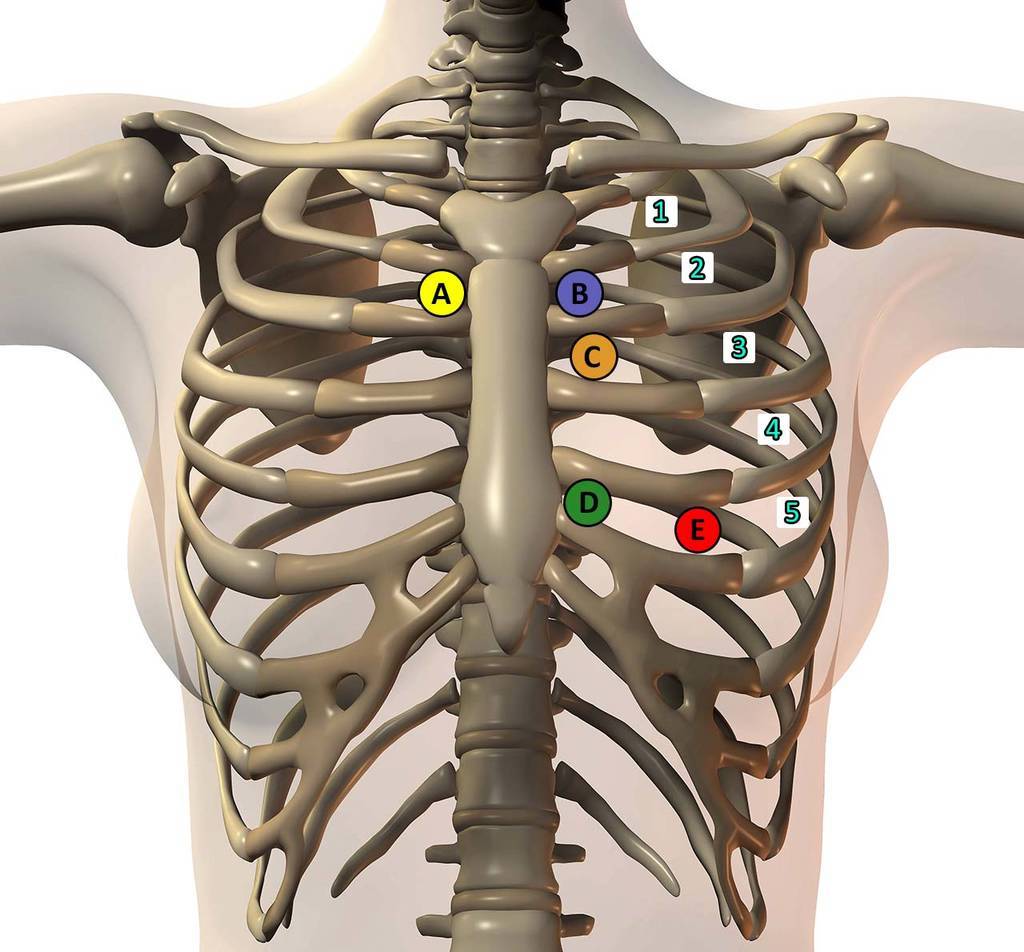
A systematic approach called a Z-pattern across to top to the pulmonary area across Erb’s point, and then toward the apex is an easy way to standardize comprehensive heart valve examination. This allows the nurse to compare sounds and accurately assess valve function by listening over easy-to-identify landmarks.
The memory aid APE-To-Man helps to recall the key anatomy to assess.
A - aortic
P - pulmonary
E - Erb’s point
T - tricuspid
M - mitral
Over Erb’s point, the S1 and S2 sound may be equal in pitch and frequency. This is the best place to assess heart rate and rhythm.
The first sound is the “lub” sound and is also referred to as S1. It is the loudest heart sound and heard when the tricuspid and mitral valves snap shut during systole. It is indicated on an electrocardiogram by the large R wave and indicates blood leaving the heart to the body. It also correlates with the carotid (or radial) pulse. Yep, never forget to assess pulses when you do your cardiac assessment.
Remember our landmarks? S1 is best heard over the apex of the heart. This is because the mitral valve is nearby and the tricuspid valve closes at the same time.
The second sound is the “dup” sound and is also referred to as S2. It always comes second, and is softer than S1 heard when the aortic and pulmonic valves snap/click shut with the beginning of diastole.
S2 is best heard over the base (top) of the heart at the mid-sternal edge and the aortic areas. Hmm, you guessed it. These valves lie directly underneath.
For more about specialized heart sounds like the infamous S3 (ventricular gallop) and split S2, check out Nursing Clinical Mastery focused cardiac assessment.
Your ultimate mission is to identify the sounds of the valves closing and opening (which happens simultaneously), and document the presence and intensity of any murmurs. These are blowing or rumbling heart sounds that may occur at any point in the cardiac cycle, but tend to occur when there is turbulence near valves.
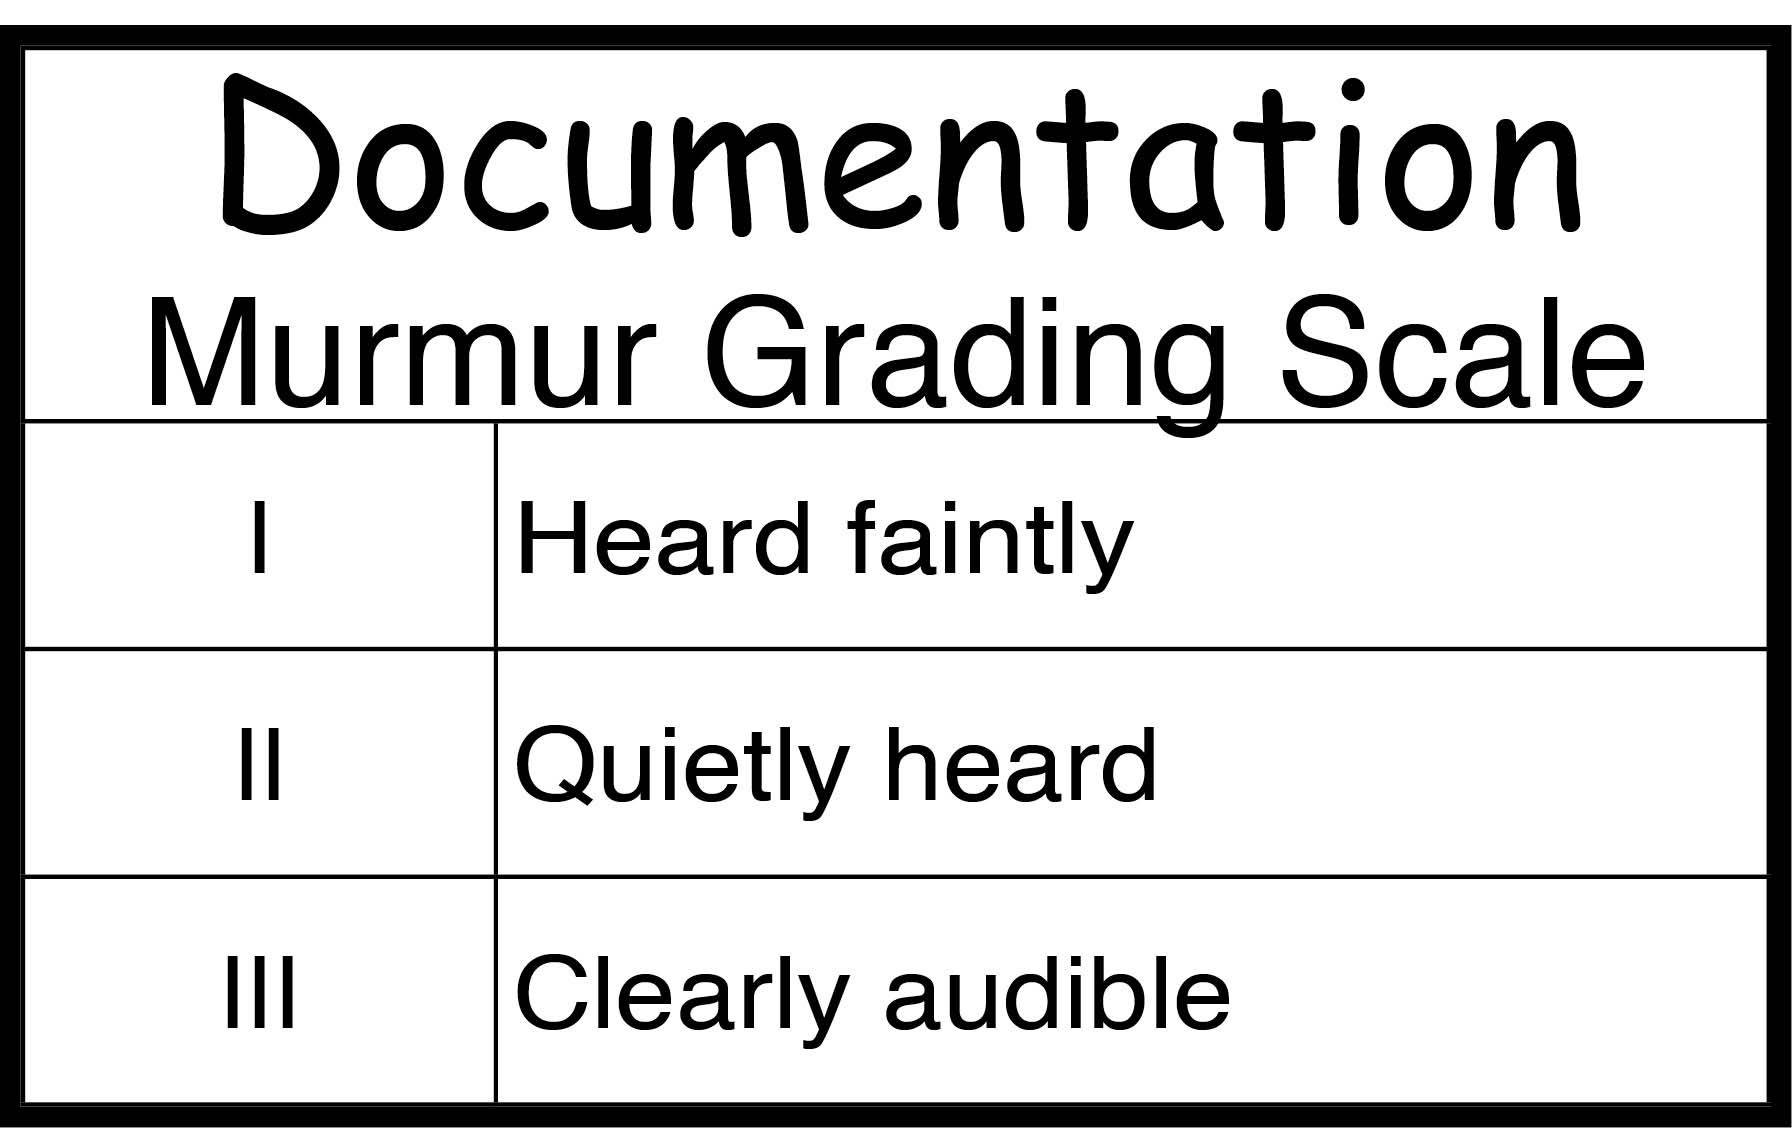
Murmur Assessment
Location, location, location!
Document the location/landmark
Soft, softer, softest...
Document intensity using a standard scale like this one
Want more practice? Check out some cool heart sounds just added to NCLEX Mastery.
Lastly Feel…
Palpation Assessment Tips
- Palpate the precordium (fancy medical term for the anterior chest wall), and assess the PMI
- Palpate each area of the heart for pulsation quality and feel for any lifts or thrills.
- As with the auscultation sequence, palpate the five primary landmarks. Use the systematic APE TO MAN sequence to standardize your assessment.
- Palpate the peripheral pulse in 2 locations. Most comprehensive assessments include listening to the carotid arteries.
Palpate the carotid pulse and radial pulses. Note the amplitude (strength) of the pulse and the contour characteristics. This includes the strength/force and the upstroke and downstroke of the pulse. Pulse intensity is commonly measured on a point scale. You can find more on that in Nursing Mastery!
Refer back to the APE TO MAN mnemonic for your landmarks: 5th intercostal space and left of the mid-clavicular line, or the point of maximal impulse (PMI) [See the letter E on Z-Pattern Key above].
Depending on patient body habitus, the pulse may be actually seen at the PMI, as with patients who are thin or who have cardiomegaly. Expert Tip: The pulse palpated at the PMI should be felt as a brief and rhythmic thump.
Note abnormal sensations during palpation:
A lift is when the pulse is so forceful that the fingers of the examiner lift off the chest, as opposed to a heave in which the pulse is visible.
A thrill is a vibration characteristic of a pulse over the PMI and feels like a purring cat. It may indicate turbulence that occurs with murmurs.
References
Bauldoff, G. Lemone, P., Gubrud, P. Carno, Margaret (2015). Lemon and Burkes’s MEDICAL-SURGICAL NURSING: Clinical reasoning in patient care. Boston: Pearson.
A.D.A.M., Inc. is accredited by URAC, for Health Content Provider (www.urac.org). Image licensed by ADAM, link via amitahealth.adam.com.